Terminal
Intro
BaseJumper base boards have a serial terminal facility, which you can use to explore, configure, test and monitor your base board.
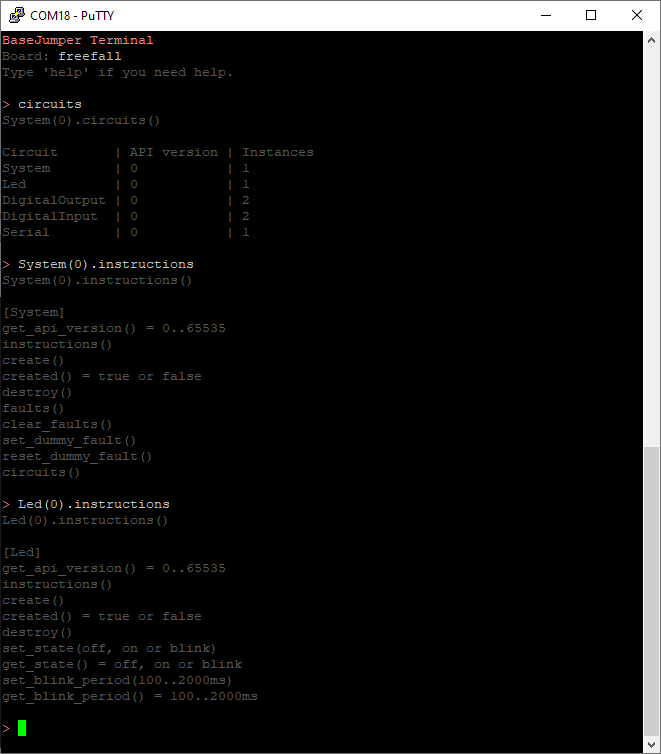
The terminal is a great place to start getting to know the base board’s features. There are system commands you can run to display all of the available circuits and list the instructions supported by each circuit. To quickly try something out you can issue a command directly to a circuit from the terminal. Here’s a sneak peak.
Don’t worry if you don’t understand the commands or syntax at this stage. It will be explained in the following sections.
Other common uses for the terminal include configuring the board number (in systems with multiple boards), checking and clearing errors and checking API versions. Check out System for more commands.
Getting Connected
To open the serial terminal, you will need to connect a USB cable between your PC and the baseboard. All baseboards have a micro USB connector, but you may need to remove the baseboard from its enclosure to access it. Once connected, the base board will appear as a virtual com port on your computer. Fire up your favourite terminal emulator, set it to serial, select the appropriate COM port and connect. It doesn’t matter what baud rate you select - the default will be fine.
Terminal Syntax
The terminal supports a sub-set of the c++ syntax that you would normally use to write a complete program or sketch. At the terminal you can create handles to circuits and issue commands to circuits.
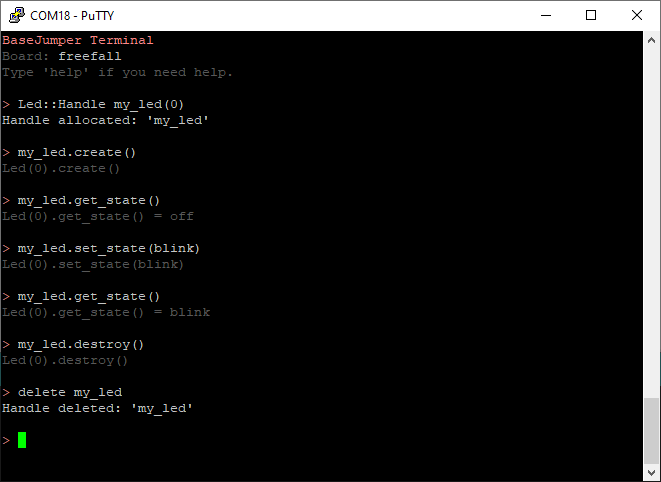
The screenshot above demonstrates how to interact with a Led circuit through the terminal. The commands entered at the terminal are similar to the equivalent c++ code, but there are a few differences which are outlined below.
No Semicolons
At the terminal we don’t need to terminate each line with ;. The terminal accepts a single command on each line. As soon as you hit enter, the command is executed.
Shortened arguments
The second thing to note from the above example is the argument passed to set_state(). In code we would have used Led::State_Blink. At the terminal we use just blink. The Led:: scoping is dropped completely, and the State_Blink has been shortened to just blink.
So if the arguments used at the terminal are different, how do you know what to use? The simplest way to find out is to use the instuctions command. When you call the instructions command on a circuit, it will print to the terminal all of the supported instructions. Along with each function it also shows the expected format of the arguments. For numeric arguments it will give an expected range.

Limited functionality
The terminal will not evaluate arbitrary c or c++ expressions. Save the if statements, for loops and arithmetic for your program or sketch.
Terminal Short-cuts
Compiled code must always strictly follow the syntax of the c++ programming language. If not, the compiler will grumble at us and refuse to generate the stream of 1s & 0s that make up our application. However, there are a few short-cuts we can take when working at the terminal. If you can remember these it will save you some key-stokes.
Faster handles
When creating a handle, typing ::Handle after the circuit type is optional.
Complete
Led::Handle my_led(0);
Shortcut
Led my_led(0);
Direct commands
The step of creating a handle can be skipped entirely. If you only want to issue one or two commands to a circuit, this can save some time. Just specify the circuit type, board number (optional) and circuit number in place of the handle when issuing the command.
Complete
Led::Handle my_led(0);
my_led.set(blink);
Shortcut
Led(0).set(blink);
Functions without arguments
When calling a function without arguments, you can drop the empty parentheses at the end of the function name.
Complete
Led(0).created()
Shortcut
Led(0).created
Implicit system commands
A handle to a System circuit is created for you automatically. The handle is named (unsurprisingly) system. You can use this handle to issue system commands;
Complete
system.print_faults()
If you issue a command without specifying a handle, it is assumed by default that the command is a System command. So using the system handle becomes optional. In this particular example we can also omit the parethesis since the instruction does not take any arguments.
Shortcut
print_faults